Hyper-V Configuration and Installation

To configure Hyper-V from another host or client PC, follow the steps given below:
Right Click on Hyper-V manager and select the “Connect to Server” link to add our core server.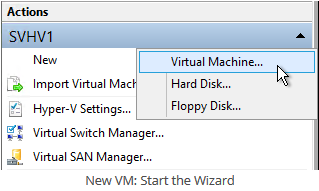
Now, type the IP/Host name of Core server in the page of “Connect to virtualization server”. In this way Hyper-v server will be added or connected to Hyper-v manage
Now, it is time to configure Hyper-v. All files of hyper-v should be located on the proper drive and you can name it as “V”. Right click on the server and go to settings. “Virtual Hard Disks” and “Virtual Machine Fields” will be found here to mention the path of default folders “v:\hyperv\disks\” to store the virtual hard disk files.
Now. It’s time to configure “Virtual Network”. For configuration of an external network that is bound by a physical network adapter, click on Action menu of the Hyper-v server go to “WIN16CORESRV” page, select “Virtual Switch Manager”.
In “virtual switches” page, click on “New virtual network switch” and select “external” from the next page and click on button “Create Virtual Switch”.
Now, it is time to click on Public network and select on “external network” and “Microsoft hyper-v Network Adapter” and check on “Allow management operating system to share this network adapter” and press on ok button.
Now your Hyper-v server is installed and configured and for testing the functionality, run the following command lines.
{Set-VMProcessor -VMName “Test VM” -ExposeVirtualizationExtensions $true}

